Flutter 中的国际化
一、前言
从 Google Live 2018开始接触 Flutter Stable 1.0 开始,慢慢的接触这款神奇的框架。实际接触了跨平台多端开发的便利性。
一款好的移动应用该具备什么品质?戳中用户痛点的功能,炫酷的 UI 还是流畅的操作体验?这些都很重要,少了其中任何一点都是得不到用户青睐的。但今天我要说的虽然不是前面这三个中的哪一个,但也是少了它就不行的“应用国际化”。
对于开发者来说,在 Android 和 iOS 开发中使用国际化已经是老掉牙的套路了,那么在 Flutter 中该如何使用国际化呢?是否也想 Android 一样只要多配置一个 xml 就能搞定了呢?
二、在 MaterialApp 中添加国际化支持
Flutter 官方鼓励我们在写 Flutter 应用的时候直接从 MaterialApp 开始,原因是 MaterialApp 为我们集成好了很多 Material Design 所必须的控件,如AnimatedThemen、GridPager 等,另外还通过 MaterialApp 配置了全局路由,方便进行页面的切换。既然如此我们就先从 MaterialApp 开始实现国际化。国际化涵盖的不单单只是多国语言,还有文字阅读方向、时间和日期格式等,但本文仅介绍多国语言的适配,它们几种还希望读者自行学习和研究。
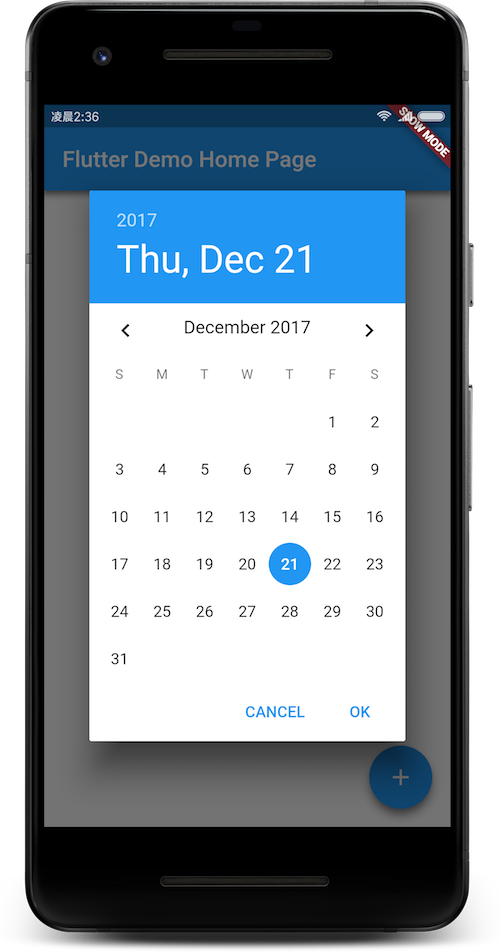
通常我们新建的 Flutter 应用是默认不支持多语言的,即使用户在中文环境下,显示的文字仍然是英文,比如下图所示的日期选择对话框:
那么怎么样将系统的这些组件国际化呢?首先需要在 pubspec.yaml 中添加如下依赖:
1
2
  flutter_localizations:
    sdk: flutter
接着运行:
1
flutter packages get
以获取依赖库。
当上面两部完成后在 main.dart 中 import 如下:
1
import 'package:flutter_localizations/flutter_localizations.dart';
然后在 MaterialApp 的构造方法中给 localizationsDelegates 和 supportedLocales 两个可选参数赋值:
1
2
3
4
5
6
7
8
9
10
11
12
13
14
15
16
17
18
19
20
21
class MyApp extends StatelessWidget {
  @override
  Widget build(BuildContext context) {
    return new MaterialApp(
      title: 'Flutter Demo',
      theme: new ThemeData(
        primarySwatch: Colors.blue,
      ),
      home: new MyHomePage(title: 'Flutter Demo Home Page'),
      ///多语言实现代理
      localizationsDelegates: [                             //此处
        GlobalMaterialLocalizations.delegate,
        GlobalWidgetsLocalizations.delegate,
      ],
      supportedLocales: [                                   //此处
        const Locale('zh','CH'),
        const Locale('en','US'),
      ],
    );
  }
}
暂时先不用理解这两个参数是什么意思,此时如果重新运行的话结果如下图:

细心的小伙伴可能发现这个 Dialog 中的文字是变成中文了,但背景中的 titlebar 的文字还是英文,难道老司机也翻车了?
其实 titlebar 中的这串文字是属于我们创建的应用的,如下:
1
home: new MyHomePage(title: 'Flutter Demo Home Page')
Flutter 框架是不知道翻译这句话。
接下来要做的就是我们自己实现一个类似 GlobalMaterialLocalizations的东西,用它来实现多语言。
首先需要准备在应用中用到的字符串,一个刚新建的 Flutter 应用用到了四个字符串,如下
- Flutter Demo
- Flutter Demo Home Page
- You have pushed the button this many times:
- Increment
这里为了简单我们只增加中文,依次对应为:
- Flutter 示例
- Flutter 示例主页面
- 你一共点击了这么多次按钮:
- 增加
两种文字准备后就可以着手写 Localizations 了,此处的 Localizations 是多国语言资源的汇总。在这里我自定义一个名为 DemoLocalizations 的类,然后将多国资源整合进此类:
1
2
3
4
5
6
7
8
9
10
11
12
13
14
15
16
17
18
19
20
21
22
23
24
25
26
27
28
29
30
31
32
33
34
35
36
37
38
class DemoLocalizations {

  final Locale locale;

  DemoLocalizations(this.locale);

  ///根据不同 locale.languageCode 加载不同语言对应
  static Map<String, Map<String, String>> _localizedValues = {
    'en': {
      'task title': 'Flutter Demo',
      'titlebar title': 'Flutter Demo Home Page',
      'click tip': 'You have pushed the button this many times:',
      'inc':'Increment'
    },
    'zh': {
      'task title': 'Flutter 示例',
      'titlebar title': 'Flutter 示例主页面',
      'click tip': '你一共点击了这么多次按钮:',
      'inc':'增加'
    }
  };

  get taskTitle{
    return _localizedValues[locale.languageCode]['task title'];
  }

  get titleBarTitle{
    return _localizedValues[locale.languageCode]['titlebar title'];
  }

  get clickTop{
    return _localizedValues[locale.languageCode]['click tip'];
  }

  get inc{
    return _localizedValues[locale.languageCode]['inc'];
  }
}
此时只要能拿到 DemoLocalizations 的对象实例,就可以调用它的taskTitle、titleBarTitle、clickTop这三个方法来获取对应的字符串。
定义完 DemoLocalizations 以后,我们就需要想这么一个问题,这个类是谁负责初始化呢?答案自然不是我们自己主动去初始化,而是需要一个叫做 LocalizationsDelegate的类来完成,LocalizationsDelegate 是一个抽象类,需要我们去实现它:
1
2
3
4
5
6
7
8
9
10
11
12
13
14
15
16
17
18
19
20
21
22
23
24
25
///多语言代理
class DemoLocalizationsDelegate extends LocalizationsDelegate<DemoLocalizations>{

  const DemoLocalizationsDelegate();

  @override
  bool isSupported(Locale locale) {
    ///支持中文和英语
    return ['en','zh'].contains(locale.languageCode);
  }

  ///根据locale,创建一个对象用于提供当前locale下的文本显示
  @override
  Future<DemoLocalizations> load(Locale locale) {
    return new SynchronousFuture<DemoLocalizations>(new DemoLocalizations(locale));
  }

  @override
  bool shouldReload(LocalizationsDelegate<DemoLocalizations> old) {
    return false;
  }

  ///全局静态的代理
  static DemoLocalizationsDelegate delegate = const DemoLocalizationsDelegate();
}
注意 load 方法,DemoLocalizations就是在此方法内被初始化的。
接着将 DemoLocalizationsDelegate 添加进 MaterialApp:
1
2
3
4
5
6
7
8
9
10
11
12
13
14
15
16
17
18
19
20
21
class MyApp extends StatelessWidget {
  @override
  Widget build(BuildContext context) {
    return new MaterialApp(
      title: 'Flutter Demo',
      theme: new ThemeData(
        primarySwatch: Colors.blue,
      ),
      home: new MyHomePage(title: 'Flutter Demo Home Page'),
      localizationsDelegates: [
        GlobalMaterialLocalizations.delegate,
        GlobalWidgetsLocalizations.delegate,
        DemoLocalizationsDelegate.delegate,                 //添加在此处
      ],
      supportedLocales: [
        const Locale('zh', 'CH'),
        const Locale('en', 'US'),
      ],
    );
  }
}
DemoLocalizationsDelegate 已经被添加进 MaterialApp,那我们该如何使用 DemoLocalizations 呢?这里就要介绍另一个 Weidget 的子类 Localizations,注意此处的 Localizations 它是一个货真价实 Widget。DemoLocalizationsDelegate 这个类的对象虽然被传入了 MaterialApp,但由于 MaterialApp 会在内部嵌套 Localizations 这个 Widget,而 LocalizationsDelegate 正是其构造方法必须的参数:
1
2
3
4
5
6
7
8
9
10
11
12
  Localizations({
    Key key,
    @required this.locale,
    @required this.delegates,                              //此处
    this.child,
  }) : assert(locale != null),
       assert(delegates != null),
       assert(delegates.any(
               (LocalizationsDelegate<dynamic> delegate)
                 => delegate is LocalizationsDelegate<WidgetsLocalizations>)
             ),
       super(key: key);
而 DemoLocalizations 的实例也是在 Localizations 中通过 DemoLocalizationsDelegate 实例化的。所以在应用中要使用 DemoLocalizations 的实例自然是需要通过 Localizations 这个 Widget 来获取的,代码如下:
1
Localizations.of(context, DemoLocalizations);
of这个静态方法就会返回 DemoLocalizations 的实例,现在先别管其内部是如何实现的。我们将这行代码放入 DemoLocalizations 中以方便使用:
1
2
3
4
5
6
7
8
9
10
11
12
13
14
15
16
17
18
19
20
21
22
23
24
25
26
27
28
29
30
31
32
33
34
35
36
37
38
39
40
41
42
43
class DemoLocalizations {

  final Locale locale;

  DemoLocalizations(this.locale);

  static Map<String, Map<String, String>> _localizedValues = {
    'en': {
      'task title': 'Flutter Demo',
      'titlebar title': 'Flutter Demo Home Page',
      'click tip': 'You have pushed the button this many times:',
      'inc':'Increment'
    },
    'zh': {
      'task title': 'Flutter 示例',
      'titlebar title': 'Flutter 示例主页面',
      'click tip': '你一共点击了这么多次按钮:',
      'inc':'增加'
    }
  };

  get taskTitle{
    return _localizedValues[locale.languageCode]['task title'];
  }

  get titleBarTitle{
    return _localizedValues[locale.languageCode]['titlebar title'];
  }

  get clickTop{
    return _localizedValues[locale.languageCode]['click tip'];
  }

  get inc{
    return _localizedValues[locale.languageCode]['inc'];
  }

  //此处
  ///通过 DemoLocalizations 加载当前的 Localizations
  static DemoLocalizations of(BuildContext context){
    return Localizations.of(context, DemoLocalizations);
  }
}
接下来就是真正使用 DemoLocalizations 的时候了,在代码中将原来的字符串替换如下:
1
2
3
4
5
6
7
8
9
10
11
12
13
14
15
16
17
18
19
20
21
22
23
24
25
26
27
28
29
30
31
32
33
34
35
36
37
38
39
40
41
42
43
44
45
46
47
48
49
50
51
52
53
54
55
56
57
58
59
60
61
62
63
64
65
66
67
68
69
70
71
72
73
74
75
76
77
78
79
80
81
82
import 'dart:async';

import 'package:flutter/material.dart';
import 'package:flutter_localizations/flutter_localizations.dart';
import 'package:flutter/foundation.dart' show SynchronousFuture;

void main() {
  runApp(new MyApp());
}

class MyApp extends StatelessWidget {
  @override
  Widget build(BuildContext context) {
    return new MaterialApp(
      title: DemoLocalizations.of(context).taskTitle,                           // 此处1
      theme: new ThemeData(
        primarySwatch: Colors.blue,
      ),
      home: new MyHomePage(title: DemoLocalizations.of(context).titleBarTitle), // 此处2
      localizationsDelegates: [
        GlobalMaterialLocalizations.delegate,
        GlobalWidgetsLocalizations.delegate,
        DemoLocalizationsDelegate.delegate,
      ],
      supportedLocales: [
        const Locale('zh', 'CH'),
        const Locale('en', 'US'),
      ],
    );
  }
}

class MyHomePage extends StatefulWidget {
  MyHomePage({Key key, this.title}) : super(key: key);

  final String title;

  @override
  _MyHomePageState createState() => new _MyHomePageState();
}

class _MyHomePageState extends State<MyHomePage> {
  int _counter = 0;

  void _incrementCounter() {
    showDatePicker(context: context,
        initialDate: new DateTime.now(),
        firstDate: new DateTime.now().subtract(new Duration(days: 30)),
        lastDate: new DateTime.now().add(new Duration(days: 30))).then((v) {});
  }

  @override
  Widget build(BuildContext context) {
    return new Scaffold(
      appBar: new AppBar(
        title: new Text(widget.title),
      ),
      body: new Center(
        child: new Column(
          mainAxisAlignment: MainAxisAlignment.center,
          children: <Widget>[
            new Text(
              DemoLocalizations.of(context).clickTop,                          // 此处3
            ),
            new Text(
              '$_counter',
              style: Theme
                  .of(context)
                  .textTheme
                  .display1,
            ),
          ],
        ),
      ),
      floatingActionButton: new FloatingActionButton(
        onPressed: _incrementCounter,
        tooltip: DemoLocalizations.of(context).inc,                           // 此处4
        child: new Icon(Icons.add),
      ),
    );
  }
}
运行!!

😂😂😂
当遇到这种突如其来的问题的时候一定要淡定,喝口水,眺望一会远方。。。
接着仔细看报错信息:The getter ‘taskTitle’ was called on null.说的很明确,在 1 处出现了空指针,我们没有像预想的一样拿到 DemoLocalizations 对象。那问题一定出在 Localizations.of 方法内部,跟进去看看:
1
2
3
4
5
6
7
  static T of<T>(BuildContext context, Type type) {
    assert(context != null);
    assert(type != null);
    final _LocalizationsScope scope =
             context.inheritFromWidgetOfExactType(_LocalizationsScope); // 此处
    return scope?.localizationsState?.resourcesFor<T>(type);
  }
关键在 context.inheritFromWidgetOfExactType处,继续进去:
1
InheritedWidget inheritFromWidgetOfExactType(Type targetType);
很简单,这是一个抽象 BuildContext 的抽象方法。此时如果再要继续追踪实现类就比较困难了,通过这个方法的注释可以知道,它是通过 targetType 来获取 context 最近父节点的对象,前提条件是 targetType 对应的类必须是 InheriteWidget 的子类。通过查看 _LocalizationsScope发现其正是继承自 InheriteWidget。那就是说没有从 context 的父节点中找到 _LocalizationsScope。此时我们再看一下调用 taskTitle 的地方:
1
2
3
4
5
6
7
8
9
10
11
12
13
14
15
16
17
18
19
20
21
class MyApp extends StatelessWidget {
  @override
  Widget build(BuildContext context) {
    return new MaterialApp(
      title: DemoLocalizations.of(context).taskTitle,                           // 此处
      theme: new ThemeData(
        primarySwatch: Colors.blue,
      ),
      home: new MyHomePage(title: DemoLocalizations.of(context).titleBarTitle),
      localizationsDelegates: [
        GlobalMaterialLocalizations.delegate,
        GlobalWidgetsLocalizations.delegate,
        DemoLocalizationsDelegate.delegate,
      ],
      supportedLocales: [
        const Locale('zh', 'CH'),
        const Locale('en', 'US'),
      ],
    );
  }
}
仔细看 taskTitle 处的 context 是从最外层的 build 方法中传入的,而在之前说过 Localizations 这个组件是在 MaterialApp 中被嵌套的,也就是说能找到 DemoLocalizations 的 context 至少需要是 MaterialApp 内部的,而此时的 context 是无法找到 DemoLocalizations 对象的。但这样进入死胡同了,实现多语言的 DemoLocalizations 需要在 MaterialApp 内部才能被找到,而这里的 title 用到的 context 是在 MaterialApp 外部的。
难道多语言在 title 上没法实现?
喝口水,眺望下远方。
既然如此我们不如看下这个 title 的说明:
1
2
3
4
5
6
7
8
9
10
11
  /// A one-line description used by the device to identify the app for the user.
  ///
  /// On Android the titles appear above the task manager's app snapshots which are
  /// displayed when the user presses the "recent apps" button. Similarly, on
  /// iOS the titles appear in the App Switcher when the user double presses the
  /// home button.
  ///
  /// To provide a localized title instead, use [onGenerateTitle].
  ///
  /// This value is passed unmodified to [WidgetsApp.title].
  final String title;
请注意这句:To provide a localized title instead, use [onGenerateTitle].
没想到啊,如果要对 title 进行多语言处理还需要 onGenerateTitle这个属性。那就简单了,更改如下:
1
2
3
4
5
6
7
8
9
10
11
12
13
14
15
16
17
18
19
20
21
22
23
class MyApp extends StatelessWidget {
  @override
  Widget build(BuildContext context) {
    return new MaterialApp(
      onGenerateTitle: (context){                                              // 此处
        return DemoLocalizations.of(context).taskTitle;
      },
      theme: new ThemeData(
        primarySwatch: Colors.blue,
      ),
      home: new MyHomePage(title: DemoLocalizations.of(context).titleBarTitle),
      localizationsDelegates: [
        GlobalMaterialLocalizations.delegate,
        GlobalWidgetsLocalizations.delegate,
        DemoLocalizationsDelegate.delegate,
      ],
      supportedLocales: [
        const Locale('zh', 'CH'),
        const Locale('en', 'US'),
      ],
    );
  }
}
此时运行会发现 taskTitle 处已经没问题了,但 titleBarTitle 这边还是报错,原因一样它的 context 使用的是 MaterialApp 外部的 context。但这里的 title 是可以被移动到 MyHomePage 内部初始的,所以很好修改,将 MyHomePage 构造方法中的 title 参数移除,直接在 AppBar 内部赋值:
1
2
3
4
5
6
7
8
9
10
11
12
13
14
15
16
17
18
19
20
21
22
23
24
25
26
27
28
29
30
31
32
33
34
35
36
37
38
39
40
41
42
43
44
45
46
47
48
class MyHomePage extends StatefulWidget {
  MyHomePage({Key key}) : super(key: key);

  @override
  _MyHomePageState createState() => new _MyHomePageState();
}

class _MyHomePageState extends State<MyHomePage> {
  int _counter = 0;

  void _incrementCounter() {
    showDatePicker(context: context,
        initialDate: new DateTime.now(),
        firstDate: new DateTime.now().subtract(new Duration(days: 30)),
        lastDate: new DateTime.now().add(new Duration(days: 30))).then((v) {});
  }

  @override
  Widget build(BuildContext context) {
    return new Scaffold(
      appBar: new AppBar(
        title: new Text(DemoLocalizations.of(context).titleBarTitle),            // 此处
      ),
      body: new Center(
        child: new Column(
          mainAxisAlignment: MainAxisAlignment.center,
          children: <Widget>[
            new Text(
              DemoLocalizations.of(context).clickTop,
            ),
            new Text(
              '$_counter',
              style: Theme
                  .of(context)
                  .textTheme
                  .display1,
            ),
          ],
        ),
      ),
      floatingActionButton: new FloatingActionButton(
        onPressed: _incrementCounter,
        tooltip: DemoLocalizations.of(context).inc,
        child: new Icon(Icons.add),
      ),
    );
  }
}
再运行:

完美。
三、国际化的初始化过程
上一节中简单介绍了如何在 MaterialApp 实现国际化,各位可能也注意到了最终语言资源的选择还是留给了 DemoLocalizations,而对语言资源本身是以什么形式存在没有特别规定。在上文中我将两国的语言放到了一个 Map 中,自然也可以将其放在服务器上,在程序启动后进行拉取,这些都是后话了,在这一节中我简单剖析下源码,看看 DemoLocalizatins 是如何在程序运行后被初始化的。
上面已经说过官方鼓励我们使用 MaterialApp 作为程序入口,我们就从 MaterialApp 出发,首先看 MaterialApp 的构造方法:
1
2
3
4
5
6
7
8
9
10
11
12
13
14
15
16
17
18
19
20
21
22
23
  MaterialApp({ // can't be const because the asserts use methods on Map :-(
    Key key,
    this.title: '',
    this.onGenerateTitle,
    this.color,
    this.theme,
    this.home,
    this.routes: const <String, WidgetBuilder>{},
    this.initialRoute,
    this.onGenerateRoute,
    this.onUnknownRoute,
    this.locale,
    this.localizationsDelegates,
    this.localeResolutionCallback,
    this.supportedLocales: const <Locale>[const Locale('en', 'US')],
    this.navigatorObservers: const <NavigatorObserver>[],
    this.debugShowMaterialGrid: false,
    this.showPerformanceOverlay: false,
    this.checkerboardRasterCacheImages: false,
    this.checkerboardOffscreenLayers: false,
    this.showSemanticsDebugger: false,
    this.debugShowCheckedModeBanner: true
  })
上面的 localizationsDelegates是多语言的关键点,由于 MaterialApp 是一个 StatefulWidget,所以直接看其对应的 State 类 _MaterialAppState中的 build 方法,代码有点长:
1
2
3
4
5
6
7
8
9
10
11
12
13
14
15
16
17
18
19
20
21
22
23
24
25
26
27
28
29
30
31
32
33
34
35
36
37
38
39
40
41
42
43
44
45
46
47
48
49
50
51
52
53
54
55
Widget build(BuildContext context) {
    final ThemeData theme = widget.theme ?? new ThemeData.fallback();
    Widget result = new AnimatedTheme(                                // 1
      data: theme,
      isMaterialAppTheme: true,
      child: new WidgetsApp(                                          //2
        key: new GlobalObjectKey(this),
        title: widget.title,
        onGenerateTitle: widget.onGenerateTitle,
        textStyle: _errorTextStyle,
        // blue is the primary color of the default theme
        color: widget.color ?? theme?.primaryColor ?? Colors.blue,
        navigatorObservers:
            new List<NavigatorObserver>.from(widget.navigatorObservers)
              ..add(_heroController),
        initialRoute: widget.initialRoute,
        onGenerateRoute: _onGenerateRoute,
        onUnknownRoute: _onUnknownRoute,
        locale: widget.locale,
        localizationsDelegates: _localizationsDelegates,                  //3
        localeResolutionCallback: widget.localeResolutionCallback,
        supportedLocales: widget.supportedLocales,
        showPerformanceOverlay: widget.showPerformanceOverlay,
        checkerboardRasterCacheImages: widget.checkerboardRasterCacheImages,
        checkerboardOffscreenLayers: widget.checkerboardOffscreenLayers,
        showSemanticsDebugger: widget.showSemanticsDebugger,
        debugShowCheckedModeBanner: widget.debugShowCheckedModeBanner,
        inspectorSelectButtonBuilder: (BuildContext context, VoidCallback onPressed) {
          return new FloatingActionButton(
            child: const Icon(Icons.search),
            onPressed: onPressed,
            mini: true,
          );
        },
      )
    );

    assert(() {
      if (widget.debugShowMaterialGrid) {    //此处如果有配置,则会显示网格
        result = new GridPaper(
          color: const Color(0xE0F9BBE0),
          interval: 8.0,
          divisions: 2,
          subdivisions: 1,
          child: result,
        );
      }
      return true;
    }());

    return new ScrollConfiguration(                                // 4
      behavior: new _MaterialScrollBehavior(),
      child: result,
    );
  }
首先在 3 处可以看到 _localizationsDelegates 被赋值给了 WidgetsApp 的 localizationsDelegates 参数。在看 1、2、4 处分别又在原有的 Widget 上做了包裹。
接着进入 WidgetApp ,它也是个 StatefulWidget,直接看它的 State 类 _WidgetsAppState的 build 方法:
1
2
3
4
5
6
7
8
9
10
11
12
13
14
15
16
17
18
19
20
21
22
23
24
25
26
27
28
29
30
31
32
33
34
35
36
37
38
39
40
41
42
43
 Widget build(BuildContext context) {
    Widget result = new Navigator(                                    // 1
      key: _navigator,
      initialRoute: widget.initialRoute ?? ui.window.defaultRouteName,
      onGenerateRoute: widget.onGenerateRoute,
      onUnknownRoute: widget.onUnknownRoute,
      observers: widget.navigatorObservers,
    );

    if (widget.textStyle != null) {
      result = new DefaultTextStyle(                                    //2
        style: widget.textStyle,
        child: result,
      );
    }

    ... //此处省略调试相关代码

    return new MediaQuery(                                              //3
      data: new MediaQueryData.fromWindow(ui.window),
      child: new Localizations(                                         //4
        locale: widget.locale ?? _locale,
        delegates: _localizationsDelegates.toList(),
        // This Builder exists to provide a context below the Localizations widget.
        // The onGenerateCallback() can refer to Localizations via its context
        // parameter.
        child: new Builder(                                             //5
          builder: (BuildContext context) {
            String title = widget.title;
            if (widget.onGenerateTitle != null) {
              title = widget.onGenerateTitle(context);
              assert(title != null, 'onGenerateTitle must return a non-null String');
            }
            return new Title(                                            //6
              title: title,
              color: widget.color,
              child: result,
            );
          },
        ),
      ),
    );
  }
在 4 处终于见到了我们熟悉的身影 Localizatins。_localizationsDelegates 也是被传递进了 Localizations。
层次如此之多,但我们关心只是其中的 Localizations,所以抛开其他不看,进入 Localizations 看看。
不出意外 Localizations 也是一个 StatefulWidget,此时我们不需要关心它的 build 方法,而是应该关注其内部的 initState 方法,如果有数据需要初始化,不出意外就是在这里进行。
initState 方法很短:
1
2
3
4
5
  @override
  void initState() {
    super.initState();
    load(widget.locale);
  }
继续进入 load 方法:
1
2
3
4
5
6
7
8
9
10
11
12
13
14
15
16
  void load(Locale locale) {
    final Iterable<LocalizationsDelegate<dynamic>> delegates = widget.delegates; // 1
    if (delegates == null || delegates.isEmpty) {
      _locale = locale;
      return;
    }

    Map<Type, dynamic> typeToResources;
    final Future<Map<Type, dynamic>> typeToResourcesFuture = _loadAll(locale, delegates) //2
      .then((Map<Type, dynamic> value) {
        return typeToResources = value;
      });

    ...

  }
1 处的 delegates 即一开始从 MaterialApp 传入的 delegate 数组,这里转成立可迭代对象。接着看 2 处的 _loadAll 方法返回的 typeToResourcesFuture ,其中的值类型为 Map<Type, dynamic>,这里可以推敲出来里边的 Type 对应的就是不同的 Localizations,而 dynamic 则是其实例。带着这样的想法看 _loadAll 方法:
1
2
3
4
5
6
7
8
9
10
11
12
13
14
15
16
17
18
19
20
21
22
23
24
25
26
27
28
29
30
31
32
33
34
35
36
37
38
39
40
41
42
43
44
45
46
47
Future<Map<Type, dynamic>> _loadAll(Locale locale, Iterable<LocalizationsDelegate<dynamic>> allDelegates) {
  final Map<Type, dynamic> output = <Type, dynamic>{};
  List<_Pending> pendingList;

  // Only load the first delegate for each delegate type that supports
  // locale.languageCode.
  final Set<Type> types = new Set<Type>();
  final List<LocalizationsDelegate<dynamic>> delegates = <LocalizationsDelegate<dynamic>>[];
  for (LocalizationsDelegate<dynamic> delegate in allDelegates) {
    if (!types.contains(delegate.type) && delegate.isSupported(locale)) {
      types.add(delegate.type);
      delegates.add(delegate);
    }
  }

  for (LocalizationsDelegate<dynamic> delegate in delegates) {
    final Future<dynamic> inputValue = delegate.load(locale);    // 1
    dynamic completedValue;
    final Future<dynamic> futureValue = inputValue.then<dynamic>((dynamic value) {
      return completedValue = value;                             // 2
    });
    if (completedValue != null) { // inputValue was a SynchronousFuture
      final Type type = delegate.type;
      assert(!output.containsKey(type));
      output[type] = completedValue;
    } else {
      pendingList ??= <_Pending>[];
      pendingList.add(new _Pending(delegate, futureValue));
    }
  }

  // All of the delegate.load() values were synchronous futures, we're done.
  if (pendingList == null)
    return new SynchronousFuture<Map<Type, dynamic>>(output);

  // Some of delegate.load() values were asynchronous futures. Wait for them.
  return Future.wait<dynamic>(pendingList.map((_Pending p) => p.futureValue))
    .then<Map<Type, dynamic>>((List<dynamic> values) {
      assert(values.length == pendingList.length);
      for (int i = 0; i < values.length; i += 1) {
        final Type type = pendingList[i].delegate.type;
        assert(!output.containsKey(type));
        output[type] = values[i];
      }
      return output;
    });
}
看 1 处,调用到了 deletegate 的 load 方法,返回一个 Future ,这里为什么不直接返回DemoLocalizations 的实例而要返回 Future,这个在前面也提到了如果你的资源是放在服务器上的,那么这就是一个耗时操作,所以在此处用了 Future。
1
2
3
4
  @override
  Future<DemoLocalizations> load(Locale locale) {
    return new SynchronousFuture<DemoLocalizations>(new DemoLocalizations(locale));
  }
由于这里返回的是 SynchronousFuture ,所以在 2 处的代码会被顺序执行,此时 completedValue 就是 DemoLocalizations 的实例对象了。然后 completedValue 被放入了 output 接着就返回出去了,最后赋值给了 _LocalizationsState 的 _typeToResources 变量。
到目前为止整个多语言的加载就完成了,剩下的就是等着被使用。下面看一下使用的方式:
1
DemoLocalizations.of(context).taskTitle
简单粗暴,根本看不出来是怎么拿到 DemoLocalizations 对象的。不多说,看代码:
1
return Localizations.of(context, DemoLocalizations);
内部调用的是 Localizations 的 of 静态方法,接着看:
1
2
3
4
5
6
static T of<T>(BuildContext context, Type type) {
  assert(context != null);
  assert(type != null);
  final _LocalizationsScope scope = context.inheritFromWidgetOfExactType(_LocalizationsScope);
  return scope?.localizationsState?.resourcesFor<T>(type);
}
前面已经讲解过 context.inheritFromWidgetOfExactType 的作用,这里的 scope 就是最靠近 context 节点的 _LocalizationsScope 类型的节点。但我们看了上面的 widget 树的层次图,并没有看到 _LocalizationsScope 这个 widget,它是在什么时候被添加进去的呢?
回到 _LocalizationsState 的 build 方法:
1
2
3
4
5
6
7
8
9
10
11
12
13
14
15
  @override
  Widget build(BuildContext context) {
    if (_locale == null)
      return new Container();
    return new _LocalizationsScope(
      key: _localizedResourcesScopeKey,
      locale: _locale,
      localizationsState: this,
      typeToResources: _typeToResources,
      child: new Directionality(
        textDirection: _textDirection,
        child: widget.child,
      ),
    );
  }
真想(●—●)。在 Localizations 的内部,它将它原本的子节点外又嵌套了 Directionality、_LocalizationsScope、Container 这三层。其中 _LocalizationsScope 就是我们想找的。
接着看:
1
  return scope?.localizationsState?.resourcesFor<T>(type);
此处调用了 _LocalizationsState 的 resourcesFor 方法:
1
2
3
4
5
  T resourcesFor<T>(Type type) {
    assert(type != null);
    final T resources = _typeToResources[type];
    return resources;
  }
到这差不多就结束了,这里根据 type 从 _typeToResources 中取出了 DemoLocalizations 的实例。
四、简单的 App 内语言切换
下面我见到介绍一下如何在不切换手机系统的语言的情况下来切换 Flutter 应用内的语言。主要用到的是 Localizations 的 override 方法。具体不多介绍,看下面我自定义的 StatefulWidget 类 FreeLocalizations 和它的 State 类 _FreeLocalizations:
1
2
3
4
5
6
7
8
9
10
11
12
13
14
15
16
17
18
19
20
21
22
23
24
25
26
27
28
29
30
31
class FreeLocalizations extends StatefulWidget{

  final Widget child;

  FreeLocalizations({Key key,this.child}):super(key:key);

  @override
  State<FreeLocalizations> createState() {
    return new _FreeLocalizations();
  }
}

class _FreeLocalizations extends State<FreeLocalizations>{

  Locale _locale = const Locale('zh','CH');

  changeLocale(Locale locale){
    setState((){
      _locale = locale;
    });
  }

  @override
  Widget build(BuildContext context) {
    return new Localizations.override(
      context: context,
      locale: _locale,
      child: widget.child,
    );
  }
}
上面代码的意思比较清晰,就是在调用 changeLocale 方法的时候修改其内部 widget 的语言。 下面来如何使用:
1
2
3
4
5
6
7
8
9
10
11
12
13
14
15
16
17
18
19
20
21
22
23
24
25
26
27
28
29
30
31
32
33
34
void main() {
  runApp(new MyApp());
}

GlobalKey<_FreeLocalizations> freeLocalizationStateKey = new GlobalKey<_FreeLocalizations>();   // 1
class MyApp extends StatelessWidget {
  @override
  Widget build(BuildContext context) {
    return new MaterialApp(
      onGenerateTitle: (context){
        return DemoLocalizations.of(context).taskTitle;
      },
      theme: new ThemeData(
        primarySwatch: Colors.blue,
      ),
      home: new Builder(builder: (context){
        return new FreeLocalizations(
          key: freeLocalizationStateKey,
          child: new MyHomePage(),
        );
      }),
      localizationsDelegates: [
        GlobalMaterialLocalizations.delegate,
        GlobalWidgetsLocalizations.delegate,
        DemoLocalizationsDelegate.delegate,
      ],
      supportedLocales: [
        const Locale('zh', 'CH'),
        const Locale('en', 'US'),
      ],
    );
  }
}
注意想要在 FreeLocalizations 外部去调用其方法需要使用到 GlobalKey 的帮助,用法见 1 处。让后我们将 MyHomePage 放入 FreeLocalizations 内部。
接着在点击按钮的时候调用如下方法:
1
2
3
4
5
6
7
8
  void changeLocale(){
    if(flag){
      freeLocalizationStateKey.currentState.changeLocale(const Locale('zh',"CH"));
    }else{
      freeLocalizationStateKey.currentState.changeLocale(const Locale('en',"US"));
    }
    flag = !flag;
  }
这一小节我讲的比较简单,但如果你看明白了二、三两节,那弄明白这里多语言是怎么切换的应该是比较容易的。
五、总结
